Friday, April 28, 2017

Christmas Blessings Pop It Up Card


I create Christmas cards all year round to teach to my in home classes and so I am under no pressure closer to the holidays to get mine done. This pretty but CAS front hides a fun pop it up surprise in the center of the card. I die cut and attached a lovely stitched snowflake from Poppystamps and added the beautiful Christmas Blessings from Sue Wilson at Creative Expressions to a belly band that holds the card closed. What happens when you slide that off?


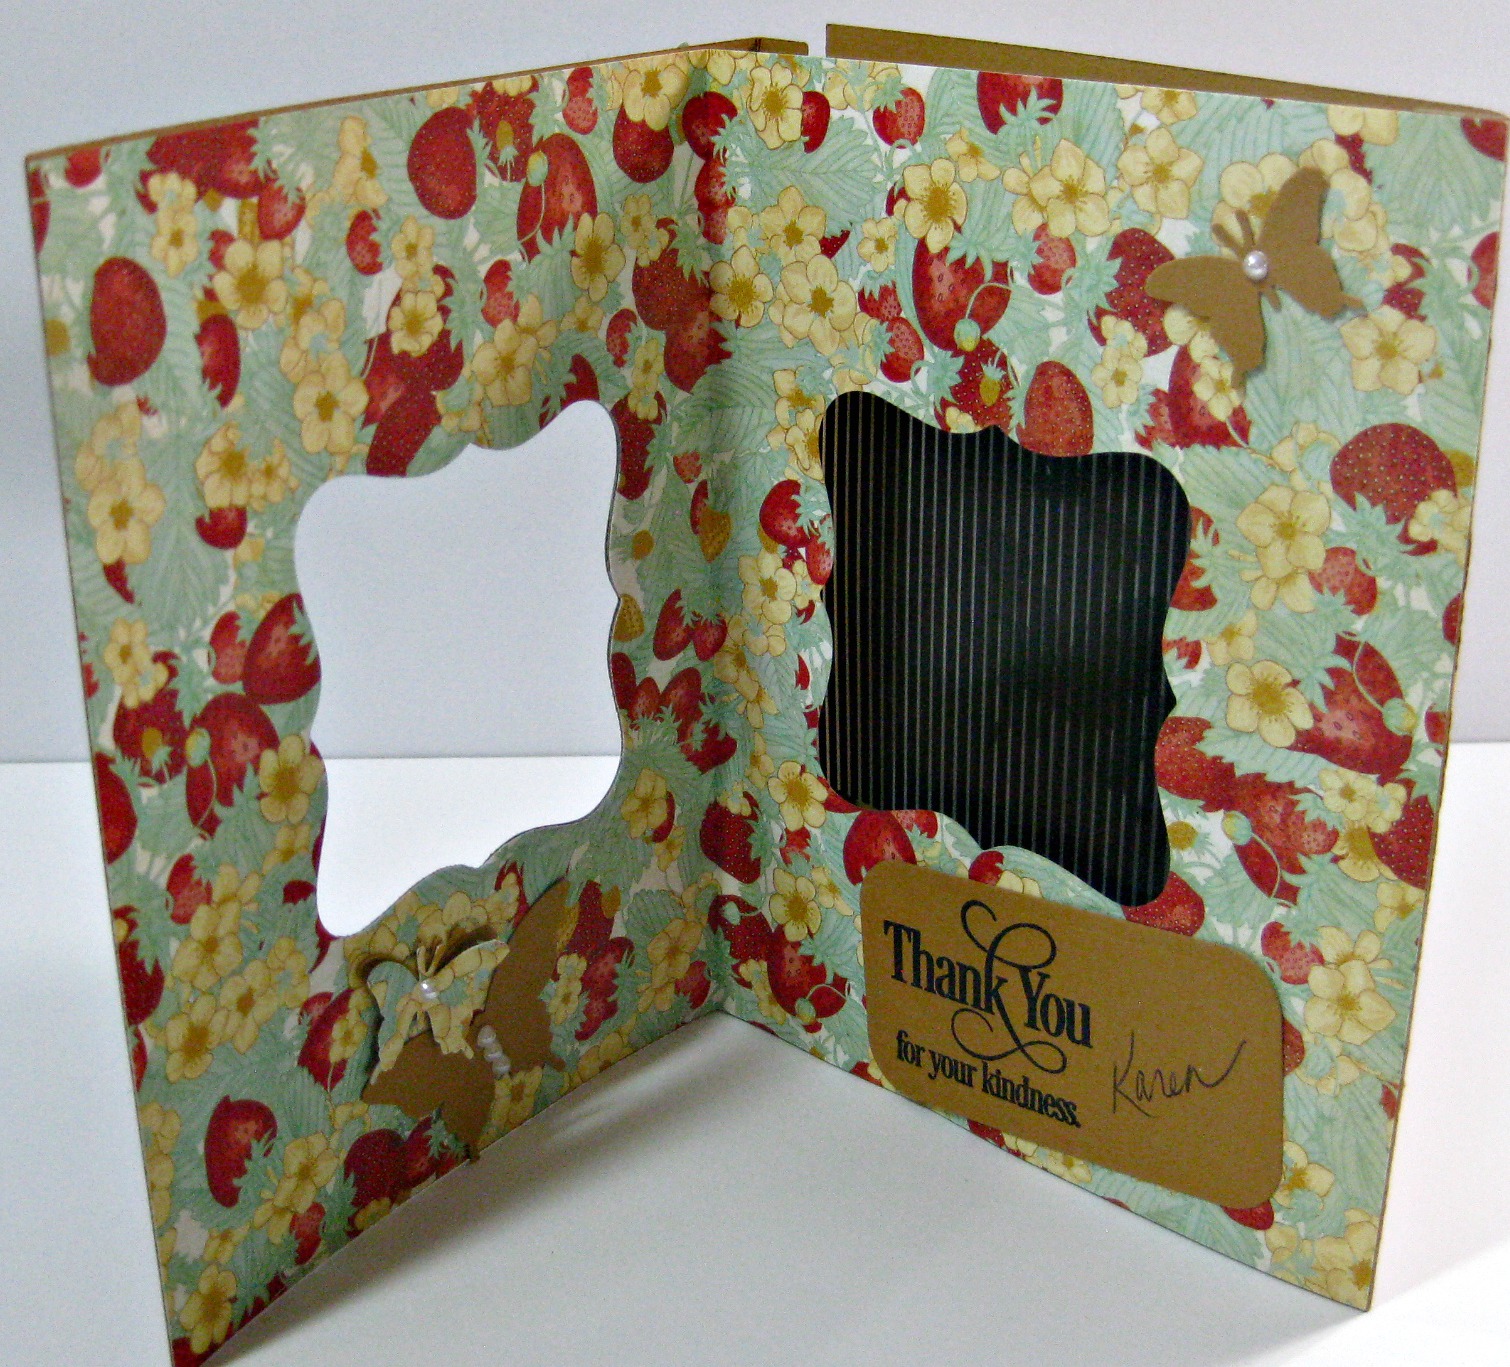
As you know if you are a regular reader, I am a big fan of Karen Burniston's line of Pop It Up dies at Elizabeth Crafts. The inside of this card was created with her Anita Frames Pop It Up die. The inside of the card looks so impressive, but is so easy to make with this die. 


Here are a few more views of this fun pop it up inside to this card. And here are some basic instructions for this card:

1. The navy blue card base was cut 6" x 9" and folded in half. 

2. The white inside piece was cut 8 1/2" x 5 1/2 and folded in half. The Anita Frames main die was placed with the center marks right on the center fold using temporary tape and run through my Tonic Tangerine Die-cutting Machine. 

3. Following the instructions in this video by Karen Burniston, I folded the score lines from the outside to the inside and Anita Frames shape is easily formed.

4. Laying the inside piece flat, I stamped the snowflake and sentiment on the right pop out frame. (All the stamps are from a set called Let it Snow that came with an UK stamping magazine.)

5. Die cut a stitched frame and the upper and lower pieces out of a snowflake designer paper, Stamp JOY on the stitched frame and attach all to the Anita Frame Pop It Up with Nuvo Deluxe Adhesive. 

6. Die cut Poppystamp's Snowflake Breeze out of navy cardstock and attach with the fine tip Nuvo Deluxe Adhesive.

7. Attach the pop it up inside to the navy cardbase with strong two sided tape one side at a time.

8. The belly band was cut 1 1/2" x 10 1/2" and folded loosely around the card, then adhered in the back with a two sided tape roller. I attached the sentiment with Nuvo Deluxe Adhesive and added some sparkly gems to complete the card.

Thanks for helping me #spread the joy of creativity!

Wednesday, April 26, 2017

Prime Publishing Opportunity Sneak Peaks


I am excited to share that some of my favorite cards and technique articles are going to be published in AllFreePaperCrafts.com. The picture above is a sneak peak at the card and technique in my first full length article that just went live here. I also wrote this article about a card by Melissa Kerman with a different twist to the same technique (that I learned about on her blog.)

When I get excited about a new technique or unique fold or product, I always start thinking about writing an article about it and for years all my articles were published by Scrap and Stamp Arts. I had three full length articles written and accepted for publication in 2017 at SSA when they suddenly went out of business in January 2017. I started looking for other stamping magazines published in the USA and did approach CardMaker with several of my ideas. I am thrilled to share they are publishing two of my cards in the Winter issue. But I have so many more cards and ideas and it is hard to find a print outlet in the United States nowadays. At CHA, I wandered into the Prime Publishing Craft booth and talked to one of the editors. She thought my cards and articles could reach many cardmakers through their AllFreePaperCrafts.com, which is an online crafting magazine that publishes frequently and is free to all subscribers. If you subscribe to the newsletters, you receive emails with some new brand content, along with some articles printed again in case you missed them, and some card ideas with link outs to tutorials on blogs. 


Sneak Peak - I shared some links to tutorials I have done both on my blog and on the Tonic Studios USA blog with the editor of AFPC.com and here is a link to a Tonic Studios tutorial and card they posted in the most recent issue. 

 I have two more never published or blogged cards that will be published in the near future in this on line magazine. If you are looking for great card and craft ideas- and who isn't- you will want to check out and possibly subscribe to AllFreePaperCrafts.com.

Thanks for helping me #spread the joy of creativity!

Monday, April 24, 2017

Floral Warm Thoughts Card


Guess what the background of this card is made with? Hand sanitizer and alcohol inks! A friend shared this idea she had found and we tried it on yupo paper. We mixed small amounts of hand sanitizer with several colors of alcohol ink and applied it to the yupo paper with acrylic blocks. You can see that layer on the top and bottom of the card front. After it dried just a bit, I decided to apply the pink mixture of hand sanitizer and alcohol ink through a Tim Holtz stencil and then for good measure, added some Nuvo clear glitter for some sparkle. Once it was dry, I attached the sparkly floral piece to a purple card base and added the beautiful "Warm Thoughts" from Quietfire Creations. Here is a close up look at the texture and sparkle:


I am entering this card in the Flowers challenge at Simon Says Stamp Wednesday Challenge.

Saturday, April 22, 2017

Alcohol Inks Floral Birthday Card


Recently I played with some friends focusing on alcohol inks and this is one of the cards we made. The focal piece was made with various alcohol inks on acetate and when it was dry, I attached it to a white piece and stamped the sentiment with black Staz-On ink. The background was embossed- but we used two or three different embossing folders all at the same time which was an idea I had never thought of. You do need a larger die-cutting/embossing machine to use several embossing folders at once and we used Tonic Studio's Tangerine. We put the yellow card front inside the embossing folders and taped them together and in place on the embossing plate with temporary tape.  I added a ribbon, some flowers and a gem to complete this colorful card.

I am entering this card in the Flowers challenge at Simon Says Stamp Wednesday Challenge.

Friday, April 21, 2017

Best Fishes with Uchi's Design Animated Stamps and Die


I have been having so much fun playing with the brand new animated stamps and dies I received from Uchi's Design. Today I am sharing another card I created with the DC105 Slider Circle Die and the grid and stamp that comes with that die set. I watched this video from Uchi's Design before I started to design which explains how to make an animated card with this die set and how the fish moves using the slider on the bottom of the card. I started with a blue card base that I cut to 5" by 12" and folded according to the video's instructions. (The video by Uchi's Design recommends dimensions of 5 3/4" x 12" so the folded card fits into a 6" x 6" envelope. I made mine to fit into an envelope I had that was about 5" x 7".)

Here are the steps I used to make this card:

1. I die cut the circle in the front of the card with one of the circle dies in the DC105 set.

2. I die cut and embossed the frame with a bubbles embossing folder from Tim Holtz and added some heart bubbles punched with a Martha Stewart punch. 

3. I stamped the fish that is included in the DC105 Slider Circle Die Set on white cardstock and attached it to the inside of the cardbase so it shows through the framed circle.

4. I die cut the slider with a stitched die from My Creative Time and stamped it with a perfect sentiment stamp from Joy's Life. Then I punched a couple arrows and popped them up on the slider to encourage the recipient to slide it back and forth. The slider is attached with two layers of mounting tape as shown in Uchi's Design instructional video linked above. Here is a video I made showing the animation when the slider is moved:

**Edited to add: I have made and added a more complete video showing this card and others I have made as well as all the products from Uchi's Design and imbedded it here. To see on YouTube and perhaps become a subscriber, here is a direct link: https://www.youtube.com/watch?v=-rdkokaL_Lc

The card is closed with mounting tape so the grid stays inside and is moved with the slider. I added a lighter blue piece to the back of the card with another perfect sentiment from the Joy's Life stamp set and a fun fish from Paper Smooches where I can sign the card.


I think any kid or kid at heart would love to receive this fun animated card! I hope you have a fintastic day!


Thanks for helping me #spread the joy of creativity!

Wednesday, April 19, 2017

Four Fold Birthday Card with Tonic Studios and Nuvo


I am proud to share that my four fold birthday card with many new Tonic Studios stamps and dies and Nuvo products is being featured today on the Tonic Studios USA blog. For all the details on how this card was made, please visit here. Comments always welcome!

And if you want more Tonic Studios and Nuvo inspiration, please join our Tonic Fanatics USA Facebook group here.

Thanks for helping me #spread the joy of creativity!

Tuesday, April 18, 2017

Metallic Tissue Butterfly Love Card

I love the metallic tissue background I learned about on a Facebook group I belong to and have made many great cards with this technique. If you would like to try it, I shared a tutorial on the technique here on my blog. I think the background is so beautiful, all I need to do is mount it on a card and add a couple diecuts and the result is a gorgeous card every time. This time I chose a lovely new butterfly die from Concord & 9th and a sentiment die from Impression Obsession. I cut both out of white and purple scraps, glued them on offsetting them just a bit and added some pearls to the butterfly. Here is a close up of the gorgeous background and butterfly:


Monday, April 17, 2017

Happy Birthday Animated Stamps Card


As I mentioned in two blogposts last week, I am having so much fun playing with the new animated stamps and dies from Uchi's Design! I created this card for my grandson's 2nd birthday even though it is months away:) I think kids of all ages will get such a kick out of opening a card and seeing the images move. I used Uchi's Design DC101 die kit to make the card base. I personalized the card with script letter stamps from Concord & 9th and added a bunch of Happy Birthday song lyrics with dies. Here are some more looks at the card showing the present and happy birthday sentiment from the Happy Birthday set of animated stamps changing as it is opened:


**Edited to add: I have made and added a complete video showing this card and others I have made as well as all the products from Uchi's Design and imbedded it here. To see on YouTube and perhaps become a subscriber, here is a direct link: https://www.youtube.com/watch?v=-rdkokaL_Lc

Too fun! I am loving these animated stamps and think you will too!


Thanks for helping me #spread the joy of creativity!

Saturday, April 15, 2017

Punches and/or Die Cuts 4 Kids at Send a Smile 4 Kids

It’s Saturday and time for another fun challenge at Send a Smile 4 Kids! This time our challenge is: Punches and/or Die Cuts 4 Kids! Create and link any card appropriate for a child with atleast one die cut or punch and you could win one of our great prizes.

We have two very generous sponsors for this challenge: Little Blue Button Stamps is giving their winner a $10 gift certificate! And the winner from Repeat Impressions will receive a $15 gift certificate! TEAM S.A.S will also be choosing their favorite cards for our top three and the winners will receive a blog badge and an opportunity to be a guest design team member on a future challenge.

On the front of my card I printed and paper pieced a sweet digi from Little Blue Button Stamps called Panda with Balloons. I cut out the card front with a stitched rectangle die from Lil' Inker. Most of the die cut fun on my card happens when it is opened:


I popped a bunch of balloons up with the Lots of Pops die from Karen Burniston. The balloons were cut with dies from Avery Elle and various polka dotted scraps. The sentiment and Awesome die are from Studio Calico. I think any child would love this interactive pop up awesome surprise when they open the card.

Thursday, April 13, 2017

Beautiful Ballerina Animated Card with Uchi's Design Stamps with YouTube Video

I posted a card yesterday on my blog introducing Uchi's Design Animated Stamps and Dies. One of my favorites of the animated stamp sets I received from Uchi's Design is called Ballerina. She spins beautifully when the animation grid is moved. 


**Edited to add: To see the animated motion of the ballerina in this card as well as the butterflies, bird and sun above, check out my Cardmaking Techniques and Tips Session 102 - Uchi's Designs Animated Stamps and Dies in Three Different Ways video on my YouTube channel here: https://www.youtube.com/watch?v=wpRxxjX_M4M&feature=youtu.be. You could even win the cards shown if you subscribe and comment before early October 2017!

Uchi's Design has several die sets that can be used with their animated stamps, but the ballerina stamp is too large for the dies, so I designed my own pull tab card. 

I cut the red frame piece 6" by 10" and scored on the long side at 1 1/2" and 6". I folded on the scored lines and punched a small opening on the right side with a one inch square punch by EK Success. I die cut the front opening with a Sunray Venus Layering Die by Tonic Studios and stamped the "beautiful" sentiment by Penny Black with black ink. 

Each stamp set comes with one animation grid and a stamped white sheet that shows all the stamps in the set. I cut that sheet to 5 inches tall by 3 3/4 inches and attached it to the back of the red frame piece, then I taped the red frame closed. I slipped in the animation grid cut to 3 7/8" by 5 1/2" so it can move easily back and forth. I cut a stitched tab using a pennant die from the Uchi Design DC101 Die Set and attached it to the right side of the animation grid using very strong thin two sided tape. When the tab is moved right and left, the ballerina spins and the small stamps around her also move. The completed red frame piece was attached to a black cardbase. I saved the Sunray Venus piece cut out of the front to stamp a sentiment from the same Penny Black set on inside the card. 


I am loving the animation stamps and die cuts that Uchi Design is just now shipping! You can shop here for these new and innovative stamps and dies.


Thanks for helping me #spread the joy of creativity!

Wednesday, April 12, 2017

Introducing Uchi's Design Animated Stamps

One of my favorite song lyrics is: "I'm so excited! I just can't hide it!"  I am feeling this way because I finally get to play with and share some totally unique and innovation stamps from Uchi's Design. I discovered Uchi's Design animated stamps at Creativation (CHA) last January and could not believe the animation motion they create in the cards they were showing! 


I created this card with the DC101 Animation Die Set which includes the dies, animation grid and butterfly stamp. I watched this video and was able to make my first animated butterfly fly easily as shown in this video:

**Edited to add: I have made and added a more complete video showing the cards I have made as well as all the products from Uchi's Design and imbedded it here. To see on YouTube and perhaps become a subscriber, here is a direct link: https://www.youtube.com/watch?v=-rdkokaL_Lc


I decided I wanted to add more animation to my second card and stamped a dragonfly from the Uchi's Design Butterflies Stamp Set along with the butterfly. The DC101 die set creates the animation movement when the card is opened. I created a gold cardbase and added some punched butterflies and a pretty frame cut out with BoBunny designer paper and two frame dies included in the DC101 Animation Die Cut Set. The stamps on the front and the inside of this card are from Penny Black. Here is a peak at the inside of my butterfly thank you card:


I used more of the beautiful BoBunny paper, some more punched butterflies, another Penny Black sentiment and a curved signature label. Still photographs just do not do these animated cards justice, so be sure to watch the video above to see the stamps move!

Oh my- I am having such fun creating with my new Uchi Designs stamps and dies! I will be sharing many more cards here, so stay tuned.


Thanks for helping me #spread the joy of creativity!

Tuesday, April 11, 2017

Guest Designer Cards Featuring Rose Mille Dresden Trims


I am so blessed with the opportunities I have to try and share products from so many great sources, and to have talented friends whose artwork I can share here on my blog. I received a big box of beautiful embossed foil Dresden trims from Rose Mille last month and shared some with my friend Gail Jaeger who created the cards in this blog post. She chose the embossed fish saying they "spoke to her" and created two cards with them. The gorgeous under water scene on the background of the first card above was created with Tim Holtz Adirondack alcohol inks on glossy paper. Several of the fish were popped up for dimension as well as the round scalloped sentiment piece (die cut with Tonic Studio dies.)


I love the layout and dimension Gail created on her second card featuring gold embossed fish from Rose Mille.  The background on this piece is stamped with a Studio 490 Wendy Vechi stamp called "all cracked up." 


Gail's last card is full of more beautiful dimension and color! The card base was made with an ombre cardstock from Colorbok. The flower was created with Susan's Garden Rose 1 by Elizabeth Crafts and the floral buds are from Gail's "stash". The final touches are the gorgeous gold embossed butterflies from the Rose Mille Embossed Foil Dresden Trims collection here. 

Monday, April 10, 2017

Birthday Card with New Gina K Therm-o-web Line


Ever since I saw Gina K demo her new line of Foil-Mates and lovely new colors of Fancy Foils at Creativation, I have been waiting anxiously to get my hands on them. Once my favorite new colors of Fancy Foil and some of her new Foil-Mates were in the house, I just had to play. I placed a Wild Lilac Fancy Foil sheet over one of the Elegant Florals Foil-Mates and ran it through my laminator. I added a strip of the white and gold ribbon from the same Therm-o-web release to the side of the card. All I needed to complete this easy but lovely card was to layer the piece onto a purple cardbase and personalize the card with my Sophisticated Script alphabet sets from Concord & 9th.


I used another of the new Gina K Foil-Mates on the inside with the Gold Sequins Fancy Foils to wish Marie a Happy Birthday. 

Thanks for helping me #spread the joy of creativity!

Saturday, April 8, 2017

Masculine Birthday with Metallic Tissue and Tonic Studios Dies

I am teaching the metallic tissue technique this month in my classes and found this sample that had not been blogged. I shared a tutorial in this blogpost on how to make this super cool background. It is not hard except the waiting for the colorful tissue paper to dry. I simply die cut and attached Tonic Studio's antique car and Happy Birthday sentiment and the guy's birthday card is complete.

I am entering this card in the Birthday celebrations at Simon Says Stamp Wednesday Challenge and at Aud Sentiments.

Friday, April 7, 2017

Foxy Lady Birthday Double Slider Card


Frankie Fox is here today to wish a foxy lady a very Happy Birthday! Tonic Studios just came out with a set of layered animal dies and I have been having so much fun designing with them. I die cut the foxy Frankie out of various scraps and layered her up with a pretty blue bow on the front of this card. 

I was reminded recently of a double slider card we had made years ago using a strip from a plastic bag on this blogpost and video.  I tried it following Dawn's instructions and it worked perfectly the first time. Here is a look at what happens when the recipient pulls on the ribbon: 


The top pulls out to reveal the birthday fox's name using Concord and 9th's Sophisticated Script stamps. On the bottom I stamped a sentiment from Art Impressions but I changed it to read " from one glamorous fox to another." I am going to share this card with the foxes in my in home classes and let them choose the name to personalize it with. 

I decided you really need to see this card being opened and closed so I set up a mini video starring my husband's hands and this fun interactive card:
I am entering this card in the Birthday celebrations at Simon Says Stamp Wednesday Challenge and at Aud Sentiments. 

Thursday, April 6, 2017

BFF Birthday Card


I just celebrated our mutual birthdays with a dear friend and this is the card I made for her. I am loving my new alphabet stamp sets from Concord and 9th because they make it so easy to personalize a card with beautiful script writing. The flower is also a stamp from Concord and 9th and I paper pieced it with a pretty coral scrap. The "nicest thought" sentiment is from a Hero Arts friend set. The flap on the right was made with some Graphic 45 dp and is held down with magnetic disks. When those magnets are opened, here is the surprise in the center of the card:


I used Karen Burniston's Anita Frame Set and more of the Graphic 45 dp to make a lovely pop up surprise. I die cut some labels with the same die set and stamped Karen's matching Happy Birthday to you on the right pop out. On the left I stamped another Hero Arts friend sentiment on the Anita Frame die cut labels.

I am entering this card in the Birthdays celebrations at Simon Says Stamp Wednesday Challenge and at Aud Sentiments. 

Tuesday, April 4, 2017

Foiled Guys Card for Classes


One of the techniques I am teaching this month in my classes is how to use what is left after running a piece of Deco Foil through the laminator with a Foilables sheet from Creative Vision Stamps. Here is the first card I made. Then I put what was left on the Emerald Watercolor Deco Foil sheet on top of a piece of Therm O Web Toner Sheet and ran it through the laminator again. The colorful background here is the result. Talk about getting your money's worth! I die cut the edge with a stitched die from Pretty Pink Posh and attached it to a top folding A2 white cardbase. I die cut and attached the vintage car (from Tonic Studios) and the sentiment (from Sue Wilson.) Here is a peak at the inside where I used the rest of the diecut bottom: 


I think my class members are going to love it!